
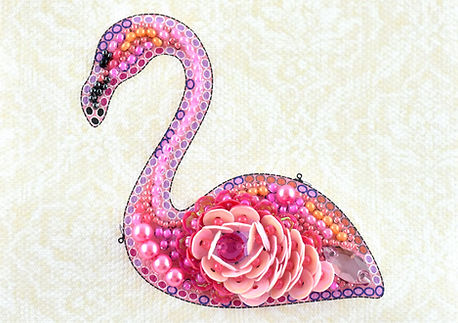
Miss Flamingo...
Stitching Sequined Brooches
Bright, girlish colors, sparkly beads and the satisfaction of a quick day project are all great incentives to get started on a new brooch kit. But what if we could make it even more special? Enter, sequined brooches!
In today’s tutorial, we’re going to explore the step-by-step process of stitching the Miss Flamingo Brooch Kit that incorporates a special technique for laying pretty pink sequins, in addition to beads, to create a glistening, three-dimensional effect for the feathers.
If you've never stitched a bead embroidery brooch before, be sure to check out our getting started tutorial for Bead Embroidered Glass Brooches that walks through all the basics of brooch making in detail. Throughout this tutorial, if there’s a basic technique we’re not covering, we include red double asterisks ( ** ) to denote links to the related Bead Embroidery 101 tutorials, so that you can reference those specific techniques in more detail. Just click the asterisks to hop over.
What We'll Cover:
Miss Flamingo: Kit Overview
As with all brooches, our kit includes all the necessary elements to create the finished piece:
1) Printed embroidery canvas w/ color key
2) Pink backing felt
3) Beading thread and needles
4) Brooch clip
5) Beads and decorative jewels
6) Instructions with full-color diagrams
To make today’s project unique, Miss Flamingo includes two shades of pink sequins and gold wire for stiffening the bird’s legs.
To begin, arrange all your beads, sequins and jewels in numerical order in your bead organizer of choice.**
Today, we are using the Star Flower Bead Organizer.

Before we start stitching, let’s examine the canvas design. We’ll be tackling the stitching in four stages: 1) Micro-beads, 2) Large Seed Beads, 3) Jewels and 4) Sequins.

In the center of the bird’s body, the large, white, teardrop section--full of colored lines--will be our sequined section at the end of the project. Do not place any regular beads in this section. Circles contained within the teardrop are alignment dots for sequins, not for seed beads.

Seed Beads & Jewels
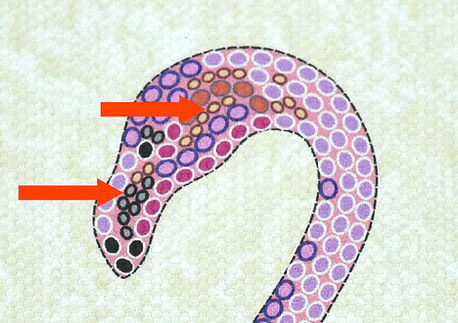
All bead embroidery projects will begin with stitching the micro-beads, because they’re easy to miss once larger beads are in place. For this design, we’re working with two colors of micro-beads: #7 pink that corresponds to the gold/brown micro-placements on the canvas and #8 charcoal that corresponds to the grey/black micro-placements on the canvas.
Throughout this project, always be mindful of the bead orientation when placing your beads**. The oval bead placement symbols on the canvas are directing you towards the appropriate angle for each bead, to properly fill the space.
Another important thing when stitching brooches, especially important to the shape of our flamingo, is where your threads are running on the back**. Once the initial beading is finished, we’ll cut out the design from the canvas. If we have run thread along the back of the canvas in an area that will be cut, our beading thread will get snipped and all the beads will fall off our design.
In the image on the left below, you see the path we followed to stitch down our micro beads that keeps within the shape of the flamingo’s body. On the right, we highlighted the stitching path in black for easier visibility.

And on the front of the design (below), we can see all of our micro-beads stitched in place. Notice there are no micro-beads throughout most of the neck of the bird. Yet, on our stitching path on the back of the canvas (above), the stitching line continues from the head, all the way down the neck, into the body.
In this situation, you have two options -- stitch the micro-beads on the head then finish off your thread and start a new thread for the body <or> following the approach we’ve taken here, start from the head and follow down the neck, placing an occasional small stitch in the canvas (without a bead) to secure the thread’s path until you reach the next area to be beaded. This avoids the need to start and end new threads.
(Beading Goofs: Can you spot the two micro-beads we forgot to stitch?)

Next up, we stitch the regular seed beads using the same approach as our micro-beads.
When stitching a brooch, remember that you always leave the outermost row of beads un-stitched until later in the project (those touching the black dashed line).
This is especially noteworthy in this design because, while working the neck, we only stitch one center column of pink beads, leaving the left and right columns un-stitched, as shown below.

In step three, we add the 5 pink pearls and the oval jewel at the tail. Because of the larger size of these decorative elements, you’ll want to double stitch each one in place.

Adding the Sequins
Now, the fun part! The sequins!
We’re working with two colors of sequins that will be paired with beads.
The smaller, dark pink sequins (#14) will be paired with the #3 seed beads. The larger, light pink sequins (#15), will be paired with the #4 beads.

Figuring out the placement order of the sequins might look daunting at first but it's very easy to do and so much fun!
Let’s walk through it step-by-step…
Set the paper instruction diagram next to the canvas.

Let’s take a closer look at the paper…
We start our sequins from the point marked ‘1’ and stitch clockwise around the teardrop until we reach the end of the red marks. For the red section, we only work with the smaller, dark pink sequins and their accompanying beads.

To begin, bring up your needle at position 1 (circled in blue below):

Load your needle as shown below with one #14 sequin, one #3 bead, one #14 sequin.
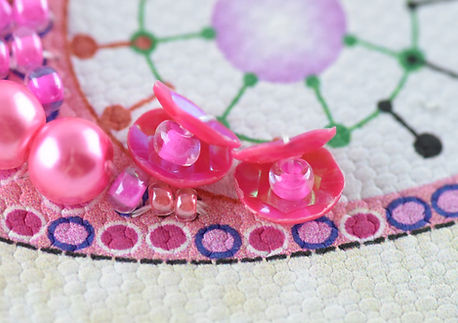
When loading sequins on your needle, note the orientation shown in Pic. 4 of the instructions – sequins should always be loaded so that the concave side of the sequin is facing the eye of the needle.
This orientation is important, to ensure the sequins sit upward on the fabric, creating the beautiful feather effect.

With the needle loaded, bring the point of the needle back down at the large red dot, opposite where you just came out. Together, the small and large red dots, attached by a red bar, form a single stitch placement.

Pull the needle through and your first set of sequins will slide into place...

Moving clockwise, we bring our needle back up at the next small red dot. Ignore the green that surrounds it...that belongs to the green stitch above.
Until you are finished will all the red stitches, ignore any other color that might overlap the red.

Load another sequin-bead-sequin set and bring the needle back down at your next large dot:

Pulling the needle through, you begin to see the feathers coming together.
Continue in the same way, working clockwise through the red stitches, until you’ve stitched the final red stitch (circled in blue below).

Continue placing sequins using the same technique-- just working back and forth in rows to fill the tip of the teardrop.
For clarity, the rows on the fabric are shown in alternating green and black. Begin with row 1 then continue to rows 2, 3 and 4.

Row 1 consists of a single stitch shown in green. Like before, bring up the needle at the small dot as shown below:

From this point on, we switch to the larger #15 sequins combined with the #4 seed beads. Load a set and come down at the large dot:

Pull taut to complete Row 1:

Row 2 is our first black row and consists of two stitches. Come up at the small dot:

Pick up and place another set of sequins.

Place the second set to finish Row 2.

Work Row 3 (a green row) the same way. This row will have 3 stitches:

Again, Row 4 is completed with 4 stitches.
After completing Row 4, we’re left with the central circle of the wing, comprised of 7 green stitch placements.

Fill the central circle the same way, working either clockwise or counterclockwise around the circle, as you prefer.

Finally, complete the wing by placing the round, pink jewel in the center hole and double-stitching it in place for security.

Basting the Bird
Congratulations! You have now completed the central portion of the stitching for our flamingo and are ready to move on to finishing!
Cut out the flamingo shape along the black dashed line, using a pair of small, sharp scissors. It’s okay to leave a little bit of excess around the outside of the dashed line, if you feel you’re getting too close to your thread. A small amount of overage can be covered by the edging beads we’ll be adding next.

Our next step is to temporarily baste the flamingo to the felt backing. If you have any concerns about the stability of the flamingo’s long neck, you’ll soon see it take shape with the aid of the thick felt we’re going to attach behind it.
To do this, lay the flamingo on top of the felt until you have full coverage around all sides (A). Using large basting stitches, secure the flamingo in place (B). Try to avoid stitching over the sequins, if possible. As with our earlier stitching, you want to be sure to work along the shape of the flamingo’s body so that you don’t snip your threads when cutting out the shape from the felt (highlighted in C).
You can secure your basting thread with a temporary knot on the back of the fabric, since it will be removed later. Then cut out the felt around the shape, leaving about a bead’s width of extra felt around the perimeter, as shown (D).

Preparing the Legs
Next, set the flamingo aside while you prepare the legs.
Your kit includes a length of gold wire (A).Un-curl and smooth out into a line (B). Using a small needle-nose pliers, if available, create a small loop or knot at one end of the wire (C). Load the wire with beads, using Pic. 3 from the instruction diagrams as a guide (D). Don’t forget the small gold bead at the very bottom!

Slide all the leg beads down onto the wire loop, so there are no gaps (E). Then, twist a larger loop at the top of the leg, snugly above the top bead (F). Load the second leg of beads onto the open end of the wire (G) and twist a final small loop, pressed snugly against the bottom gold bead. Snip off the remaining wire using a wire cutters (H) -- (don’t ruin your sewing scissors!).

Next up, we attach the legs to the flamingo body. To determine where the attachment goes, identify the blue diamond on Pic. 1 of your instruction diagrams (see red arrow in A). Looking at the bead placements that surround the blue dot, correlate this location to the canvas.
Once you’ve identified the location on the canvas (if you’re slightly off, it’s no big deal!), insert the loop at the top of legs between the felt and canvas layers as shown in B.
Using a doubled length of thread, stitch the loop to the canvas (but not stitching the felt) several times, until you’re satisfied that the legs are securely in place and where you want them (C).

Looking at the back of the project, you should see only our basting stitches, with the legs neatly tucked away between the fabric layers.

Finishing Techniques
From this point on, finishing the brooch will follow the same three-step process as all other brooches.
When stitching the final rows of beads, do your best to not hold the flamingo by the legs or sequins, as they are the most delicate features. The brooch is large enough to easily hold in hand without touching the sequins, which helps keep Miss Flamingo’s feathers fluffy and pretty!
Begin by adding the outermost row of beads**, being mindful to not stitch through the back of the felt. A blanket stitch is the best stitch for this step, which securely nests each bead in place and keeps them from trying to twist off the edge of the fabric.
After adding the outermost row of beads, you can remove your basting stitches. Then, add the gold beaded edge around the entire brooch ** .
Finally, attach the brooch pin onto the back, centered behind the sequins.
You’re finished! With her sparkling beads, colorful feathers and long, golden legs, Miss Flamingo is ready to take her spot on the runway!
Thank you for reading! We hope you enjoyed this tutorial and found helpful information for your next beading project.
If you have questions, comments or ideas for tutorials you’d like to see, please leave us a comment below.
