
Foundational Knitting...
Ribbing Stitches 101
One of the most common categories of knitting stitch patterns are Ribbing Stitches. Also called Rib or Ribbed stitches, this elastic category of stitch patterns is especially popular for sleeves, socks and other applications where you want stretch in your project.
If you look at the cuff of most knitted socks, whether hand-knit or machine-made, you will likely notice that the top section of the cuff is worked in a different stitch pattern than the rest of the sock. This stretchy, elastic section, which allows the sock to stay snugly in place on the wearer's calf, is a ribbing pattern. These same stretchy stitches are also often used on the brims of hats, sweater sleeves, necklines and around the waist of some sweaters.
Think of ribbing stitches as the elastic of knitting. They're used wherever a pattern requires a stretchy element, as a functional part of a design or for decoration.
In this article, we'll take a look at how ribbing stitches are created and the different types of ribbing stitches used in knitting.
To demonstrate, we used Clover Takumi Bamboo Double Point needles in size US 7 and Paintbox Cotton Aran yarn in colors #644 Raspberry Pink and #650 Candyfloss Pink -- part of the Tudor Garden Collection.
What We'll Cover:
> Basic Ribbing Stitches
> How To Work 1/1 Rib
> Understanding Ribbing Instructions in a Knitting Pattern
> Working 1/1 Rib on an Odd Number of Stitches
> Other Types of Basic Rib Stitches
> Alternating Between Knit and Purl Stitches
> How to Cast Off Ribbing
> Corrugated Ribbing
> Decorative Ribbing Stitches

Basic Ribbing Stitches
All ribbing stitches are comprised of vertical columns of alternating knit and purl stitches. This is what defines a 'ribbed' stitch and separates it from other types of knitting stitches. While there are many varieties of ribbing stitches, they all have this in common.
The diagram below shows an example of a basic ribbing pattern, where columns of knit and purl stitches are alternated to create a simple ribbing:

The pattern depicted in the diagram above is the most basic of all ribbing stitches. Called Single Rib or 1/1 Rib, this pattern is created by alternating 1 knit stitch and 1 purl stitch across the row.
How to Work 1/1 Rib
1/1 Rib is usually the first ribbing stitch that knitters learn. It's easy to work and the most widely used ribbing stitch. The term '1/1' means that the pattern alternates 1 knit stitch and 1 purl stitch.
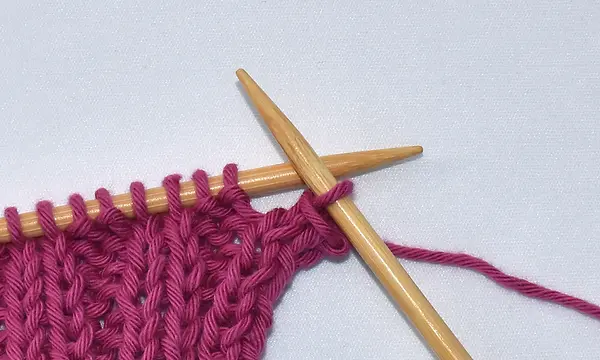
Begin by casting on an even number of stitches. While there are certain cast on methods specifically designed to be extra-stretchy for ribbing stitches, they're not required. You can use any cast on method you like. For our example, we've cast on 20 stitches using a basic Thumb Cast On.

To work the first row, knit 1 stitch, then purl 1 stitch. Keep alternating back and forth in this fashion, until you reach the end of the row. Your row will end with a purl stitch.

For 1/1 Rib, there's only 1 row in the repeat. You will work every row the same way, beginning with a knit stitch and alternating back and forth to the end of the row.
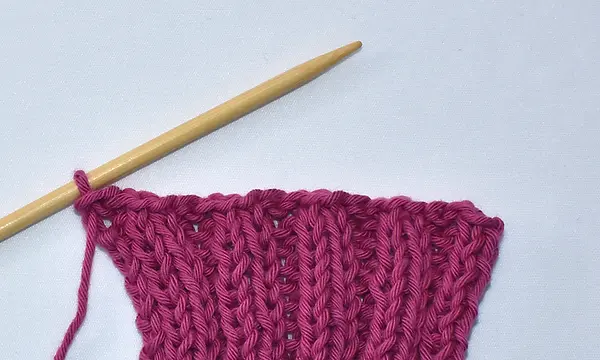
Once your piece measures the desired length, cast off using the method of your choice. For our swatch below, we worked 20 rows of 1/1 Rib:

Upon inspection, you can see that when not stretched, 1/1 Rib looks very similar to Stockinette Stitch. This is because when the fabric is relaxed, only the columns of knit stitches are visible. Until you stretch the fabric, you won't see the alternating columns of purl stitches.

Different types of ribbing stitches have varying levels of elasticity. 1/1 Rib is the most elastic type of ribbing. Below we see our sample of 1/1 rib measures 3 inches wide, when not stretched.

Here, the same piece of 1/1 Rib has been pulled horizontally, to reveal it's elasticity, which allows it to expand to 4 inches wide.
(Note: Cotton yarns, such as the one we've used here, have fairly little elasticity, compared to fibers such as wool, which would have an even more significant stretch than shown in this example.)

Once stretched, the fabric no longer resembles Stockinette Stitch. You can see the alternating columns of knit and purl stitches. Below, the white arrows point to the columns of knit stitches and the pink arrows point to the columns of purl stitches.

Understanding Ribbing Instructions in a Knitting Pattern
In a knitting pattern, the instructions for working this 20-stitch piece of 1/1 Rib would read as follows:
Cast on 20 stitches.
ROW 1: *K1, P1; repeat from * to end of row
Repeat Row 1 until your piece measures 4". Cast off.
However, because 1/1 Rib is such a common stitch pattern, many designers will assume that the knitter already knows how to work it. Therefore, rather than listing the specific instructions, the pattern may simply say:
Cast on 20 stitches and work in 1/1 Rib until your piece measures 4", then cast off.
If your pattern instructions read this way, just remember to begin every row with a knit stitch and alternate back and forth between knit and purl stitches to the end of the row.
Working 1/1 Rib on An Odd Number of Stitches
While most patterns call for 1/1 Rib to be worked over an even number of stitches, you will sometimes run into patterns that require an odd number of stitches.
1/1 Rib can be worked on an odd number of stitches, but it's important to be sure you're starting each row with the correct stitch.
K P K P K P K P K
You begin and end with a Knit stitch.
For your 2nd row and all even rows thereafter, work:
P K P K P K P K P
You begin and end with a Purl stitch.
In a knitting pattern, these instructions would be written as follows:
Cast on 9 stitches.
ROW 1: K1, *P1, K1; repeat from * to end of row
ROW 2: P1, *K1, P1; repeat from * to end of row
Repeat Rows 1-2 until your piece measures 4". Cast off.
Regardless of how many stitches you're working on, the only thing you have to remember for basic ribbing stitches is:
"Always work each stitch the same as the stitch below it."
If the next stitch is over a knit column, knit it. If the next stitch is over a purl column, purl it.
It doesn't take long for a new knitter to learn how to identify knit and purl stitches. With a little practice, you'll have no trouble at all deciphering the fabric to determine how to work your stitches.
Other Types of Basic Rib Stitches
There are a number of different basic rib stitches which alternate a certain number of knit stitches with a certain number of purl stitches to create the pattern. While 1/1 Rib is the most common, you will also frequently encounter rib stitches such as 2/2 Rib, 2/1 Rib or 3/1 Rib.
As with 1/1 Rib, many knitting patterns will not give specific instructions on how to work these basic knit/purl rib stitches. Fear not! While they may appear daunting at first, simple rib stitches are very easy to work without a pattern. You only need to look at the numerical designation.
Unless a pattern specifically states otherwise, the first number is always the number of knit stitches and the second number is the number of purl stitches.
The simplest rib patterns are ones that repeat the same number of knit and purl stitches, such as 1/1, 2/2 or 3/3 Rib.
2/2 Rib is worked by knitting 2, then purling 2.
3/3 Rib is worked by knitting 3, then purling 3.
For these types of rib patterns, you work every row the same way.
Begin by knitting the designated number of knit stitches, then purling the designated number of purl stitches and repeat until the end of the row.
For example, if your pattern says "Cast on 8 stitches and work 25 rows in 2/2 Rib", then you will work every row as follows:
K K P K K P K K P
The 2nd row and all even rows thereafter will be worked the opposite:
P P K P P K P P K
This applies to all basic rib stitches that have a different number of knit and purl stitches.
Here we have an example of 2/2 Rib. You can see that it alternates 2 columns of knit stitches with 2 columns of purl stitches.

In a side-by-side comparison, we see the difference between the 1/1 and 2/2 Rib:

The important thing to remember with ribbed stitches is that the more stitches there are in the repeat, the less stretch the fabric will have. A 3/1 Rib pattern is less stretchy than a 1/1 Rib pattern. This is why 1/1, 2/1 and 2/2 Ribs are the most popular. Once you get into ribs that have 3 or more knit stitches in each repeat, they become significantly less stretchy and eventually serve more for appearance than elasticity. While technically you could work an 8/6 Rib pattern, the level of elasticity with so many stitches would be almost the same as Stockinette Stitch.
Alternating Between Knit and Purl Stitches
If you're not used to working stitch patterns that alternate between knit and purl stitches in the same row, it's important to know how to properly transition your yarn to not accidentally end up increasing stitches.
To work a knit stitch, the yarn needs to be in the back of the work. To work a purl stitch, the yarn needs to be in the front of the work. In order to alternate back and forth, you need to yarn forward and yarn back.
Yarn Back
After working the designated number of purl stitches, your yarn is positioned in the front.

Now you must bring the yarn to the back of the work, so that you can work your knit stitches. To do this, you're going to 'yarn back'.
Wrap the yarn clockwise around the right needle tip, as shown:

Pull your yarn to the back of the work:

Your yarn is now in the back of the work and you're ready to start knitting.

Yarn Forward
After working the designated number of knit stitches, your yarn will be in the back of the work.

Before you can starting purling, you will need to work a maneuver called a 'yarn forward', to bring your yarn to the front of the work.
To do so, wrap the yarn counter-clockwise around the right needle tip as shown:

Pull the yarn to the front of the work:

You've now completed your yarn forward and are ready to start purling.

How to Cast Off Ribbing
While there is no right or wrong way to cast off a piece of ribbing, there are certain types of cast offs that are especially well suited to ribbing because they result in an elastic edge that flows with the pattern of the ribbing.
An easy cast off method for ribbing is called 'casting off in pattern', which we'll demonstrate below.
Here, we've worked 17 rows of 2/2 Rib and are ready to cast off:

STEP 1: To begin your cast off, work the first 2 stitches 'in pattern' - which means that if they're knit stitches, you knit them and if they are purl stitches, you purl them. Since we're casting off a piece of 2/2 Rib, our first two stitches are knit stitches, so we knit them both.
If you were working 1/1 Rib, you would knit 1, then purl 1.

STEP 2: Insert the left needle tip from left to right into the first (rightmost) stitch on the right needle:

STEP 3: Use your left needle to pull that stitch over the other stitch on the right needle and off the tip of the right needle.
You have now cast off 1 stitch and should only have 1 stitch remaining on the right needle:
STEP 4: Work your next stitch 'in pattern' -- in this case, we purled the next stitch.
There are now 2 stitches on the right needle again.

STEP 5: Again, as you did in Steps 2-3, insert the left needle into the first (rightmost) stitch on the right needle and pull it over the second stitch and off the needle. You have now cast off 2 stitches:

Continue to repeat Steps 4-5; working 1 stitch in pattern, then passing the previous stitch over it, until you only have one stitch remaining on your needle.
To finish, cut the yarn, leaving a short tail. Pull the needle to draw the last loop through. Once you weave in your yarn tail, you'll have a smooth cast off, creating a clean edge on your ribbing.

Corrugated Ribbing
While most ribbing stitches are made using only one color, Corrugated Ribbing is a style that uses two different colors to create a pattern of vertical stripes. This ribbing technique is most often used to create ornate cuffs on mittens and gloves or as a decorative edge for sweater sleeves and waistbands.

Corrugated Ribbing is a form of stranded colorwork, which is created by knitting with one color and purling with another. The color not being used is 'stranded' along the back of the work, creating strings of yarn along the wrong side of the work called 'floats' (as seen in the image below).
Usually, Corrugated Ribbing is worked on either a 1/1 or 2/1 Rib base.
This type of ribbing is not reversible and therefore typically used for projects where only the right side of the work will show, such as sweaters and mittens.

The wrong side of a swatch of Corrugated Ribbing, which shows the floats being carried along the back of the work.
Corrugated Ribbing is significantly more difficult than regular, single-color ribbing, making it a poor choice for new knitters. It's best to learn how to work basic stranded colorwork on Stockinette Stitch, before attempting to learn Corrugated Ribbing.
Decorative Ribbing Stitches
In addition to simple knit/purl ribbing stitches, there are also many forms of decorative ribbing stitches created by adding other elements to the basic ribbing. Usually, decorative ribbing stitches are less elastic (or even non-elastic) compared to regular ribbing stitches. However, they create beautiful edges for projects such as sweaters and boot cuffs, or can be used as all-over patterns for pillows and other projects.
In all decorative ribbing stitches, you can still see the vertical columns of knit and purl stitches that define them as ribbing patterns. Below, we have an example of a decorative ribbing stitch which uses simple increases and decreases to create a pretty, yet non-elastic ribbing.

For this pattern, we cast on 18 stitches and worked as follows:
ROW 1: *Kf&b; repeat from * to end of row
ROW 2: *K2tog, P2tog; repeat from * to end of row
Repeat Rows 1-2 for 20 rows. Cast off.
Thank you for reading! We hope you enjoyed this tutorial and found helpful information for your next knitting project.
If you have questions, comments or ideas for tutorials you’d like to see, please leave us a comment below.