
Foundational Stitches...
Crochet 101: Single Crochet (SC)
Single Crochet (abbreviated as SC in patterns) is the first of the four fundamental stitches in crochet. A staple in many crochet patterns, it's usually the first stitch that a person new to crochet learns and soon becomes their go-to for many projects. Used to create almost anything, from blankets and sweaters to doilies, bags and more, it is the base for most crocheted Amigurumi toys and, when combined with other stitches, can create an endless number of beautiful crochet stitch patterns.
American crochet patterns refer to this stitch as Single Crochet. However it's important to note that UK crochet patterns call this same stitch Double Crochet. This can cause a lot of confusion because there's a different crochet stitch called Double Crochet in US patterns.
So before you begin any crochet pattern, always be sure to check whether the pattern is written in US or UK terminology. While US terminology is more predominant, there are many UK crochet patterns as well. Most patterns will say somewhere within the pattern (or on the pattern website) the type of terminology being used. If in doubt, contact the designer directly to ask.
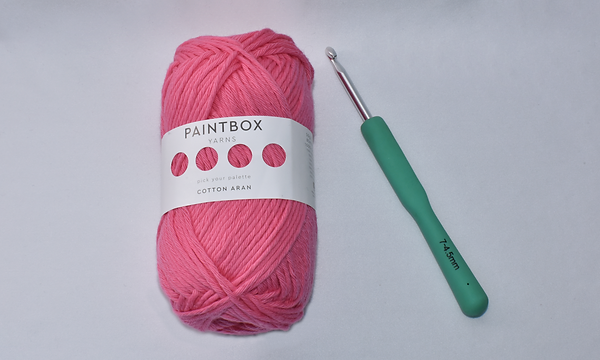
For this tutorial we used Paintbox Cotton Aran yarn in color #651 Bubblegum Pink -- part of the Tudor Garden Collection, with a size US 7 (4.5mm) crochet hook. This affordable cotton yarn is ideal for beginners and comes in a wide range of colors.
When first learning to crochet, it's best to choose light color yarns, which make it easier to see your stitches and help to prevent mistakes.
What We'll Cover:
> Stitch Characteristics & Curling
To begin, we'll create a foundation chain. The length of your foundation chain depends on how wide of a piece of fabric you want to make. You need to chain the number of stitches you want, plus 1.
For this tutorial, we want 14 stitches, so we're going to chain 15 (abbreviated as 'ch 15').

Crocheting into the foundation chain can be difficult at first, but fear not! With a little practice, it'll become second nature.
Let's take a closer look at the foundation chain...
The loop that's on your hook does not count as a stitch. The first actual stitch is the one to the left of your hook. When beginning your row, skip over the first stitch and insert your hook into the second stitch (indicated by the arrow below).

Insert your hook into 2nd stitch:

Next, wrap the yarn clockwise around the hook. This motion is called a yarn over. In patterns, this is abbreviated as yo.

Pull the yarn-over loop through the chain stitch but NOT through the first loop on the hook.
You will now have two loops on your hook:

Yarn over again, by bringing the yarn clockwise around the hook:

Then pull the yarn through both loops on the hook, to complete the stitch:

That's it! You've worked your first Single Crochet stitch!
Repeat this process to Single Crochet into each chain until you reach the end of the row.
When you near the end of the row, make sure to not skip the final chain. It's especially easy on your first row of stitches to miss this last chain, resulting in a decrease in your stitch count.
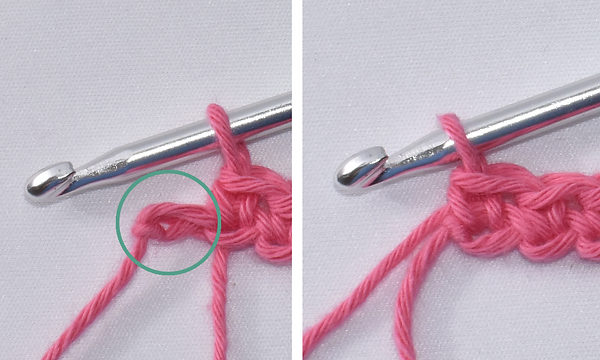
In the image below, we've yet to work into the final stitch of the row:


Once you've worked your final stitch, your finished row should look like this:
Let's take a closer look...
On the left we see our unfinished row, with one chain (circled) still waiting to be worked. On the right, we worked our final SC into that chain, to complete the row.
Once you finish your first row, the hardest part is over. Even for experienced crocheters, the first row is the hardest to work. Crocheting into the foundation chain can be tricky, because it's difficult to hold and the stitches are not as loose as in subsequent rows.
Before you can begin your next row, you must crochet a turning chain. The turning chain is worked between every row of crochet, to bring the yarn up to the necessary height to start the next row.
The length of the turning chain depends on the height of the stitch you're working. For Single Crochet, the turning chain consists of only 1 chain.
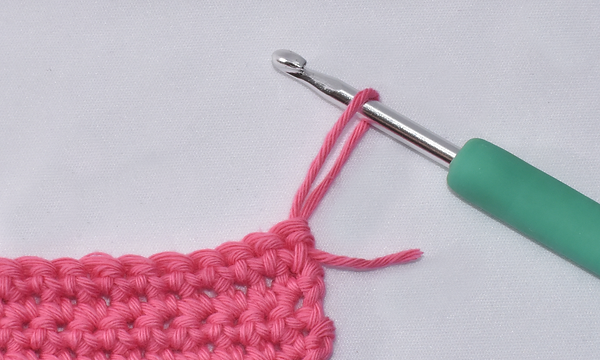
To work your turning chain, wrap the yarn around the hook (yarn over)...

...and pull it through the stitch on your hook:

In a pattern, this would written as 'ch 1'.
With your turning chain complete, you can begin your next row. To start, turn the work so your hook is on the right side:

Just like the first row, the loop on the hook (pink arrow) does not count as a stitch. The 1st stitch will be skipped over and you will begin the row by inserting your hook into the 2nd stitch:

Beginning with the 2nd stitch, SC into each stitch across the row, the same as you did for the first row.
Most new crocheters accidentally decrease stitches because it's so easy to miss stitches. Until you get used to identifying them, it's helpful to count as you work each stitch, to be sure you're working the same number of stitches on each row.
Here, we've completed our second row by working 14 Single Crochet stitches:

Keep working in this manner until your piece measures the desired length. Just remember to count your stitches and always work your turning chain before beginning a new row.
Below, we worked 16 rows of Single Crochet and are ready to finish our piece.
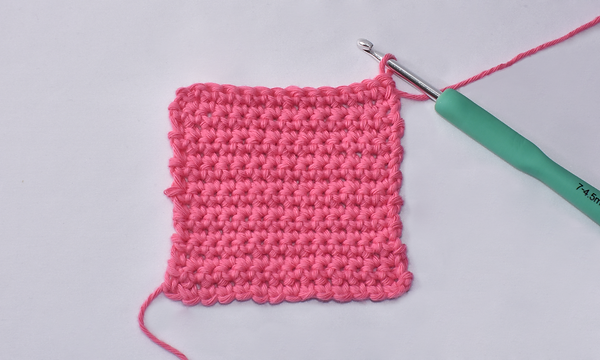
Once your work reaches the desired length, cut the yarn, leaving a 3-4" tail. Then, pull the crochet hook to pull the tail through:
Use a tapestry needle to neatly weave in the two yarn tails into the back of the work.
Voilà! You now have a finished piece of Single Crochet fabric!

Stitch Characteristics & Curling
Single Crochet creates a dense and durable fabric, ideal for projects such as toys and home accessories. Single Crochet stitches are the shortest (height-wise) of the four basic crochet stitches. Because they are small, the stitches create an excellent background upon which to work surface embroidery or add embellishments.
The front and back sides of Single Crochet look almost identical. To the inexperienced eye, it's almost impossible to tell them apart, making it an excellent stitch pattern for projects where both sides of the fabric will be visible.

A downside to Single Crochet, compared to other basic crochet stitches, such as Half Double Crochet and Double Crochet, is that it often curls. Depending on the project, that can cause a problem.
The extent to which a piece of Single Crochet fabric will curl depends mostly on the fiber content of the yarn and how tightly the stitches are worked. New crocheters tend to work very tight stitches, so they often experience more curling than experienced crocheters.
If you're having trouble with curling, go up to a larger size crochet hook and try to work a little more loosely, so that your stitches aren't as tight. As a general rule, a 100% wool yarn with a size US H (5mm) hook is a good combination for beginners.

How to Practice Single Crochet
Learning Single Crochet is only the beginning of your crochet journey. With so many stitches and techniques to choose from, you'll have lots of fun exploring your new hobby.
But before you go further, it's best to practice your basic crochet stitches, which will provide you with the skills necessary for creating more advanced crochet projects.
A few fun projects you can make with only Single Crochet:
COASTERS:
A fast, easy and practical project for the home, crochet coasters are a great way to practice and handy to have around.
Choose a worsted weight yarn in a light color and a size US 7 (4.5mm) or US H (5mm) crochet hook. Usually, the best yarn for coasters is pure cotton yarns, which create a dense coaster that's machine-washable. The Paintbox Cotton Aran used in this tutorial is a perfect choice.
To begin, ch 16 for your foundation chain. Work in Single Crochet until your coaster is square, then cut the yarn and weave in the tails. Keep in mind to only work 15 stitches per row, because the 1st stitch is skipped over on each row.
POTHOLDERS:
For a slightly larger project, you can create a sturdy potholder. This double-thick, washable potholder will not only give you lots of practice but will likely become a go-to in your kitchen!
Choose a worsted weight cotton or wool yarn and US 7 (4.5mm) or US H (5mm) hook and ch 31 for your foundation chain. Work in single crochet until your work measures twice its width.
Cut your yarn, leaving a long tail. Thread the tail onto a tapestry needle and fold your work in half, to create a square. Using the tapestry needle, stitch around the three open sides to close your potholder.
HEADBAND:
A great project for new crocheters who love headbands.
Because they're worn against the skin, you'll want to choose a soft, warm yarn, such as a pure wool or a wool/acrylic blend. Cascade 220, Ella Rae Classic Wool and Paintbox Wool Mix Aran are good, affordable choices and come in a large range of colors.
Choose the width of the headband you want to make and crochet a foundation chain of that length. Typically, headbands measure 3-4" wide. Use a tape measure to measure the circumference of the recipient's head (a standard size for adults is around 20-23").
Work in Single Crochet until the headband measures half an inch shorter than the head circumference. To ensure a proper fit before cutting your yarn, wrap the headband around the recipient's head, pinching the two ends together. If no adjustments are necessary, cut the yarn, leaving an 8-10" tail. Thread the tail onto a tapestry needle and seam the two ends together.
Quick Visual: Single Crochet
Here's a quick 'at-a-glance' reference for working Single Crochet:


Thank you for reading! We hope you enjoyed this tutorial and found helpful information for your next crochet project.
If you have questions, comments or ideas for tutorials you’d like to see, please leave us a comment below.
Love the quick visual. Thank you!